React 可以改变你对所看到的设计以及所构建的应用程序的看法。以前你看到的是一片森林,使用 React 后,你将欣赏到每一棵树。React 简化了你对设计系统(design system)和 UI 状态的看法。在本教程中,我们将带领你使用 React 构建一个可搜索的数据表产品,并领略整个思考的过程。
从原型开始
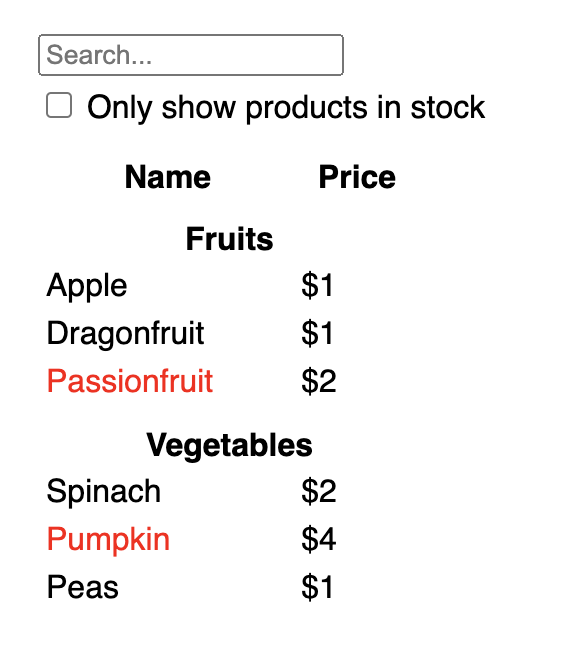
假设你已经拥有了一个 JSON API 以及一个来自设计师的原型设计。
JSON API 返回的数据如下所示:
[
  { category: "Fruits", price: "$1", stocked: true, name: "Apple" },
  { category: "Fruits", price: "$1", stocked: true, name: "Dragonfruit" },
  { category: "Fruits", price: "$2", stocked: false, name: "Passionfruit" },
  { category: "Vegetables", price: "$2", stocked: true, name: "Spinach" },
  { category: "Vegetables", price: "$4", stocked: false, name: "Pumpkin" },
  { category: "Vegetables", price: "$1", stocked: true, name: "Peas" }
]
原型设计如下:
用 React 实现 UI 的话,通常遵循相同的五个步骤。
第一步:将 UI 分解为组件结构
首先,在原型图中的每个组件及其子组件周围画一个框,并为他们命名。如果你有设计师搭档的话,他们可能已经在设计工具中为这些组件命名了。请与他们确认!
根据你的背景不同,你可以考虑采用不同的方式将原型设计拆分为不同的组件:
- 编程—使用相同的技术来决定是否需要创建新函数或对象。其中一个方法是 单一责任原则(single responsibility principle),也就是说,一个组件在理理想情况下只负责一件事情。如果变得臃肿了,则应将其分解为更小的子组件。
- CSS—考虑类选择器(class selector)的用途。(但是,组件的粒度要小一些。)。
- 设计—考虑如何阻止设计中所用的图层(layer)。
如果 JSON 的结构良好,你通常会发现它能很自然地映射到 UI 的组件结构上。这是因为 UI 和数据模型通常具有相同的信息结构,即相同的模型(shape)。将 UI 分成多个组件,每个组件将与数据模型的一部分相匹配。
下图中可以看到有五个组件:
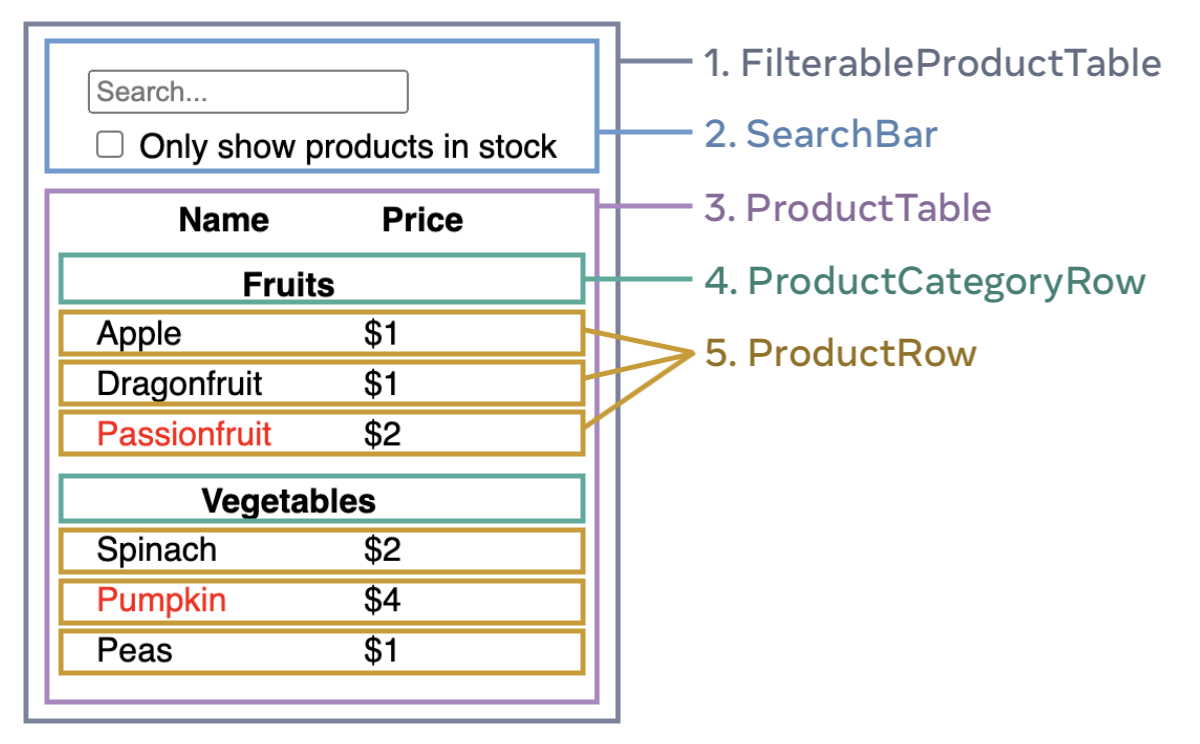
FilterableProductTable(灰色部分)包含了整个应用程序。SearchBar(蓝色部分)接收用户输入。ProductTable(紫色部分)根据用户的输入显示和筛选列表。ProductCategoryRow(绿色部分)显示每个类别的标题。ProductRow(黄色部分)每行显示一个产品。
注意看 ProductTable (即紫色部分),你会发现表头(包含 “Name” 和 “Price” 字样)并非是独立组件。这其实是一个偏好的问题,你可以选择将其独立成组件或作 ProductTable 组件的组成部分。在本例中,表头是 ProductTable 的组成部分,因为它出现在 ProductTable 的列表中。但是,如果此表头变得复杂了(例如需要添加排序功能),则更适合将其提取为 ProductTableHeader 组件。
既然你已经在原型图中标识了组件,那么就将它们排列成一个层级结构吧。在原型图中如果一个组件出现在另一个组件中,那么就应该作为子组件显示在层级结构中:
FilterableProductTableSearchBarProductTableProductCategoryRowProductRow
第二部:基于 React 构建静态版本
现在,你已经梳理了组件的层次结构,是时候开始实现这个应用程序了。最直接的方法是构建一个利用数据模型渲染 UI 的版本,此时无需添加任何交互功能。先构建静态版本然后再添加交互功能,通常是一条便捷的路径。构建静态版本需要大量的码字,但无需太多思考;而添加交互功能则需要大量的思考,码字反而不多。
要构建一个渲染数据模型的静态版本应用程序,你需要在重用其他组件的基础上构建新 组件(components) 并通过 props 传递数据。props 是将数据从父组件传递到子组件的一种方式。(如果你对于 state 的概念有了解的话,请不要使用 state(状态) 来构建这个静态版本的应用程序,state 仅用于交互,也就是随时间而变化的数据。由于这里要构建的是静态版本的应用程序,因此不要用 state。)
你可以按照“自上而下”(即,从较高层级的组件,例如 FilterableProductTable,开始构建)或“自下而上”(即,从较低层级的组件,例如 ProductRow,开始构建)的顺序构建所有组件。在比较简单的项目中,自上而下的方式通常共容易;而在较大的项目中,自下而上的方式更容易。
function ProductCategoryRow({ category }) {
  return (
    <tr>
      <th colSpan="2">
        {category}
      </th>
    </tr>
  );
}

function ProductRow({ product }) {
  const name = product.stocked ? product.name :
    <span style={{ color: 'red' }}>
      {product.name}
    </span>;

  return (
    <tr>
      <td>{name}</td>
      <td>{product.price}</td>
    </tr>
  );
}

function ProductTable({ products }) {
  const rows = [];
  let lastCategory = null;

  products.forEach((product) => {
    if (product.category !== lastCategory) {
      rows.push(
        <ProductCategoryRow
          category={product.category}
          key={product.category} />
      );
    }
    rows.push(
      <ProductRow
        product={product}
        key={product.name} />
    );
    lastCategory = product.category;
  });

  return (
    <table>
      <thead>
        <tr>
          <th>Name</th>
          <th>Price</th>
        </tr>
      </thead>
      <tbody>{rows}</tbody>
    </table>
  );
}

function SearchBar() {
  return (
    <form>
      <input type="text" placeholder="Search..." />
      <label>
        <input type="checkbox" />
        {' '}
        Only show products in stock
      </label>
    </form>
  );
}

function FilterableProductTable({ products }) {
  return (
    <div>
      <SearchBar />
      <ProductTable products={products} />
    </div>
  );
}

const PRODUCTS = [
  {category: "Fruits", price: "$1", stocked: true, name: "Apple"},
  {category: "Fruits", price: "$1", stocked: true, name: "Dragonfruit"},
  {category: "Fruits", price: "$2", stocked: false, name: "Passionfruit"},
  {category: "Vegetables", price: "$2", stocked: true, name: "Spinach"},
  {category: "Vegetables", price: "$4", stocked: false, name: "Pumpkin"},
  {category: "Vegetables", price: "$1", stocked: true, name: "Peas"}
];

export default function App() {
  return <FilterableProductTable products={PRODUCTS} />;
}
(如果上面这段代码看起来很吓人,请先浏览 快速入门 吧!)
在构建组件后,你将拥有一个可重用的组件库用于渲染数据模型。因为这是一个静态版本的应用程序,所以组件只返回 JSX。层级结构中的顶层组件(FilterableProductTable)负责将数据模型作为 prop 向下传递。这被称为 单向数据流(one-way data flow),因为数据是从顶层组件向下流动到底层组件的。
Pitfall
截止到此步骤,你无需使用任何状态值(state values)。下一步才需要!
第三步:找到 UI 状态中的最小且完整的呈现 state
为了让 UI 具有交互性,你需要让用户能够更改底层的数据模型。state 正是为此而生的。
Think of state as the minimal set of changing data that your app needs to remember. The most important principle for structuring state is to keep it DRY (Don’t Repeat Yourself). Figure out the absolute minimal representation of the state your application needs and compute everything else on-demand. For example, if you’re building a shopping list, you can store the items as an array in state. If you want to also display the number of items in the list, don’t store the number of items as another state value—instead, read the length of your array.
现在回想一下这个示例程序中的所有数据:
- The original list of products
- The search text the user has entered
- The value of the checkbox
- The filtered list of products
Which of these are state? Identify the ones that are not:
- Does it remain unchanged over time? If so, it isn’t state.
- Is it passed in from a parent via props? If so, it isn’t state.
- Can you compute it based on existing state or props in your component? If so, it definitely isn’t state!
What’s left is probably state.
Let’s go through them one by one again:
- The original list of products is passed in as props, so it’s not state.
- The search text seems to be state since it changes over time and can’t be computed from anything.
- The value of the checkbox seems to be state since it changes over time and can’t be computed from anything.
- The filtered list of products isn’t state because it can be computed by taking the original list of products and filtering it according to the search text and value of the checkbox.
This means only the search text and the value of the checkbox are state! Nicely done!
Deep Dive
Props vs State
Step 4: Identify where your state should live
After identifying your app’s minimal state data, you need to identify which component is responsible for changing this state, or owns the state. Remember: React uses one-way data flow, passing data down the component hierarchy from parent to child component. It may not be immediately clear which component should own what state. This can be challenging if you’re new to this concept, but you can figure it out by following these steps!
For each piece of state in your application:
- Identify every component that renders something based on that state.
- Find their closest common parent component—a component above them all in the hierarchy.
- Decide where the state should live:
- Often, you can put the state directly into their common parent.
- You can also put the state into some component above their common parent.
- If you can’t find a component where it makes sense to own the state, create a new component solely for holding the state and add it somewhere in the hierarchy above the common parent component.
In the previous step, you found two pieces of state in this application: the search input text, and the value of the checkbox. In this example, they always appear together, so it is easier to think of them as a single piece of state.
Now let’s run through our strategy for this state:
- Identify components that use state:
ProductTableneeds to filter the product list based on that state (search text and checkbox value).SearchBarneeds to display that state (search text and checkbox value).
- Find their common parent: The first parent component both components share is
FilterableProductTable. - Decide where the state lives: We’ll keep the filter text and checked state values in
FilterableProductTable.
So the state values will live in FilterableProductTable.
Add state to the component with the useState() Hook. Hooks let you “hook into” a component’s render cycle. Add two state variables at the top of FilterableProductTable and specify the initial state of your application:
function FilterableProductTable({ products }) {
  const [filterText, setFilterText] = useState('');
  const [inStockOnly, setInStockOnly] = useState(false);
Then, pass filterText and inStockOnly to ProductTable and SearchBar as props:
<div>
  <SearchBar
    filterText={filterText}
    inStockOnly={inStockOnly} />
  <ProductTable
    products={products}
    filterText={filterText}
    inStockOnly={inStockOnly} />
</div>
You can start seeing how your application will behave. Edit the filterText initial value from useState('') to useState('fruit') in the sandbox code below. You’ll see both the search input text and the table update:
import { useState } from 'react';

function FilterableProductTable({ products }) {
  const [filterText, setFilterText] = useState('');
  const [inStockOnly, setInStockOnly] = useState(false);

  return (
    <div>
      <SearchBar
        filterText={filterText}
        inStockOnly={inStockOnly} />
      <ProductTable
        products={products}
        filterText={filterText}
        inStockOnly={inStockOnly} />
    </div>
  );
}

function ProductCategoryRow({ category }) {
  return (
    <tr>
      <th colSpan="2">
        {category}
      </th>
    </tr>
  );
}

function ProductRow({ product }) {
  const name = product.stocked ? product.name :
    <span style={{ color: 'red' }}>
      {product.name}
    </span>;

  return (
    <tr>
      <td>{name}</td>
      <td>{product.price}</td>
    </tr>
  );
}

function ProductTable({ products, filterText, inStockOnly }) {
  const rows = [];
  let lastCategory = null;

  products.forEach((product) => {
    if (
      product.name.toLowerCase().indexOf(
        filterText.toLowerCase()
      ) === -1
    ) {
      return;
    }
    if (inStockOnly && !product.stocked) {
      return;
    }
    if (product.category !== lastCategory) {
      rows.push(
        <ProductCategoryRow
          category={product.category}
          key={product.category} />
      );
    }
    rows.push(
      <ProductRow
        product={product}
        key={product.name} />
    );
    lastCategory = product.category;
  });

  return (
    <table>
      <thead>
        <tr>
          <th>Name</th>
          <th>Price</th>
        </tr>
      </thead>
      <tbody>{rows}</tbody>
    </table>
  );
}

function SearchBar({ filterText, inStockOnly }) {
  return (
    <form>
      <input
        type="text"
        value={filterText}
        placeholder="Search..."/>
      <label>
        <input
          type="checkbox"
          checked={inStockOnly} />
        {' '}
        Only show products in stock
      </label>
    </form>
  );
}

const PRODUCTS = [
  {category: "Fruits", price: "$1", stocked: true, name: "Apple"},
  {category: "Fruits", price: "$1", stocked: true, name: "Dragonfruit"},
  {category: "Fruits", price: "$2", stocked: false, name: "Passionfruit"},
  {category: "Vegetables", price: "$2", stocked: true, name: "Spinach"},
  {category: "Vegetables", price: "$4", stocked: false, name: "Pumpkin"},
  {category: "Vegetables", price: "$1", stocked: true, name: "Peas"}
];

export default function App() {
  return <FilterableProductTable products={PRODUCTS} />;
}
In the sandbox above, ProductTable and SearchBar read the filterText and inStockOnly props to render the table, the input, and the checkbox. For example, here is how SearchBar populates the input value:
function SearchBar({ filterText, inStockOnly }) {
  return (
    <form>
      <input
        type="text"
        value={filterText}
        placeholder="Search..."/>
Refer to the Managing State to dive deeper into how React uses state and how you can organize your app with it.
Step 5: Add inverse data flow
Currently your app renders correctly with props and state flowing down the hierarchy. But to change the state according to user input, you will need to support data flowing the other way: the form components deep in the hierarchy need to update the state in FilterableProductTable.
React makes this data flow explicit, but it requires a little more typing than two-way data binding. If you try to type or check the box in the example above, you’ll see that React ignores your input. This is intentional. By writing <input value={filterText} />, you’ve set the value prop of the input to always be equal to the filterText state passed in from FilterableProductTable. Since filterText state is never set, the input never changes.
You want to make it so whenever the user changes the form inputs, the state updates to reflect those changes. The state is owned by FilterableProductTable, so only it can call setFilterText and setInStockOnly. To let SearchBar update the FilterableProductTable’s state, you need to pass these functions down to SearchBar:
function FilterableProductTable({ products }) {
  const [filterText, setFilterText] = useState('');
  const [inStockOnly, setInStockOnly] = useState(false);

  return (
    <div>
      <SearchBar
        filterText={filterText}
        inStockOnly={inStockOnly}
        onFilterTextChange={setFilterText}
        onInStockOnlyChange={setInStockOnly} />
Inside the SearchBar, you will add the onChange event handlers and set the parent state from them:
<input
  type="text"
  value={filterText}
  placeholder="Search..."
  onChange={(e) => onFilterTextChange(e.target.value)} />
Now the application fully works!
import { useState } from 'react';

function FilterableProductTable({ products }) {
  const [filterText, setFilterText] = useState('');
  const [inStockOnly, setInStockOnly] = useState(false);

  return (
    <div>
      <SearchBar
        filterText={filterText}
        inStockOnly={inStockOnly}
        onFilterTextChange={setFilterText}
        onInStockOnlyChange={setInStockOnly} />
      <ProductTable
        products={products}
        filterText={filterText}
        inStockOnly={inStockOnly} />
    </div>
  );
}

function ProductCategoryRow({ category }) {
  return (
    <tr>
      <th colSpan="2">
        {category}
      </th>
    </tr>
  );
}

function ProductRow({ product }) {
  const name = product.stocked ? product.name :
    <span style={{ color: 'red' }}>
      {product.name}
    </span>;

  return (
    <tr>
      <td>{name}</td>
      <td>{product.price}</td>
    </tr>
  );
}

function ProductTable({ products, filterText, inStockOnly }) {
  const rows = [];
  let lastCategory = null;

  products.forEach((product) => {
    if (
      product.name.toLowerCase().indexOf(
        filterText.toLowerCase()
      ) === -1
    ) {
      return;
    }
    if (inStockOnly && !product.stocked) {
      return;
    }
    if (product.category !== lastCategory) {
      rows.push(
        <ProductCategoryRow
          category={product.category}
          key={product.category} />
      );
    }
    rows.push(
      <ProductRow
        product={product}
        key={product.name} />
    );
    lastCategory = product.category;
  });

  return (
    <table>
      <thead>
        <tr>
          <th>Name</th>
          <th>Price</th>
        </tr>
      </thead>
      <tbody>{rows}</tbody>
    </table>
  );
}

function SearchBar({
  filterText,
  inStockOnly,
  onFilterTextChange,
  onInStockOnlyChange
}) {
  return (
    <form>
      <input
        type="text"
        value={filterText} placeholder="Search..."
        onChange={(e) => onFilterTextChange(e.target.value)} />
      <label>
        <input
          type="checkbox"
          checked={inStockOnly}
          onChange={(e) => onInStockOnlyChange(e.target.checked)} />
        {' '}
        Only show products in stock
      </label>
    </form>
  );
}

const PRODUCTS = [
  {category: "Fruits", price: "$1", stocked: true, name: "Apple"},
  {category: "Fruits", price: "$1", stocked: true, name: "Dragonfruit"},
  {category: "Fruits", price: "$2", stocked: false, name: "Passionfruit"},
  {category: "Vegetables", price: "$2", stocked: true, name: "Spinach"},
  {category: "Vegetables", price: "$4", stocked: false, name: "Pumpkin"},
  {category: "Vegetables", price: "$1", stocked: true, name: "Peas"}
];

export default function App() {
  return <FilterableProductTable products={PRODUCTS} />;
}
You can learn all about handling events and updating state in the Adding Interactivity section.
Where to go from here
This was a very brief introduction to how to think about building components and applications with React. You can start a React project right now or dive deeper on all the syntax used in this tutorial.